
What better time to do a post on Tillandsia (Air Plant) care than when we have just received a fresh drop of Air Plant Holders arrive at the warehouse. Now not only can you give these unique plants the pedestals they deserve, but the plant care they require too!
Often sold as the perfect plant for people who aren't good with plants, Air Plants (or Tillandsias) are often thought of as low maintenance, living sculptures. There are many different types of 'air plants', but for the purposes of this blog we'll be discussing Tillandsias in particular.
Tillandsia is the genus of a variety of air plants - the most common in the air plant family - and they originate from Central and South America. They are hardy and can tolerate degrees of neglect given the right conditions, belonging to that unique group of plants known as Epiphytes. An Epiphyte is a plant that grows without soil, living on the surface of another plant. Without soil to lay its roots, the epiphyte will often get its water via collection in its foliage or, in the case of the Tillandisa, by taking moisture and nutrients out of the air. Usually this requires humid conditions, but some Tillandisa have adapted to arid environments too.
They are from the family Bromeliaceae, making them related to Bromeliads. Given the right care, they are a low maintenance, beautiful plant that will even reward you with a flower if you get things right.

Tillandsia Plant Care
Light
As always, when we bring a plant into our home we want to do our best to replicate the conditions in their natural environment. Given they are often rainforest plants, they do best in bright, filtered light. Keep them out of direct sunlight but give them a space full of indirect light. And if you don't have a room that provides adequate light, think about using a full spectrum grow light.
Potting Mix
Easy. None. Nada. Zilch. Instead, you want to make sure these plants have a position in your home with plenty of airflow. There are plenty of tutorials online providing advice on how to hang or display your airplants.
Or, let us do the hard work and pick one of our Air Plant Holders to help them shine for you. These will help ensure the plant gets proper airflow and can dry out without developing mould or rot. Make sure the bottom of the plant is allowed to 'breathe' (that is, receives plenty of airflow) as it is the most susceptible to root rot.

Water
I told you these guys were low maintenance...
Unlike other plants, Tillandsias don't use their tendrils to draw up water. These are used to cling onto surfaces and other plants. Instead, watering these plants involves a regular 'dunking' (or soak) every couple of weeks. Best way to know when to water is that the leaves have started to wrinkle or not firm.
Depending on how many plants you have, how you soak might vary. I like to fill my sink and put all my airplants in their together. Half an hour is perfect. Remove, let them dry out and relax! (Hot tip: set an alarm to remind you to remove them from the water. I have lost many a plant because i've forgotten they were soaking and subsequently over waterered them.)
Be careful with the water you use though! Best is filtered water, or tap water that has been allowed to stand for at least 24hrs. Too much salt or minerals in the water can end up damage the plant and its sensitive foliage.
Many people think that Tillandisas require constant misting. If you're giving them a proper soaking when they need it you won't need to provide them with constant misting. If you do mist, do it in the morning to allow them to dry out over the day.
Fertiliser
Given their sensitive foliage, you want to make sure you don't over fertilise these plants. Our Indoor Plant Food can be added to the soaking once a fortnight. Another alternative is to dilute into a mister and spray the plants with the same frequency. As long as fertilising does not happen more than once every two weeks, your plants will reward you with more growth and potentially even a bloom!
 Photo by Mariana Sturza
Humidity
Tillandsias engage in a different type of photosynthesis called CAM (Crassulacean Acid Metabolism) where the plants stomata open at night to maximise moisture intake. This is because the evening is the most humid time in their natural environments. As such, Tillandisas in the home can adapt to dryer conditions, as long as adequate moisture is provided. Keep an eye on their foliage until you get into a good watering routine and you'll be fine, and avoid soaking overnight.
All this being said, keeping your Tillandsia in a glasshouse or Terrarium won't hurt - it will mean you'll be soaking them less frequently.
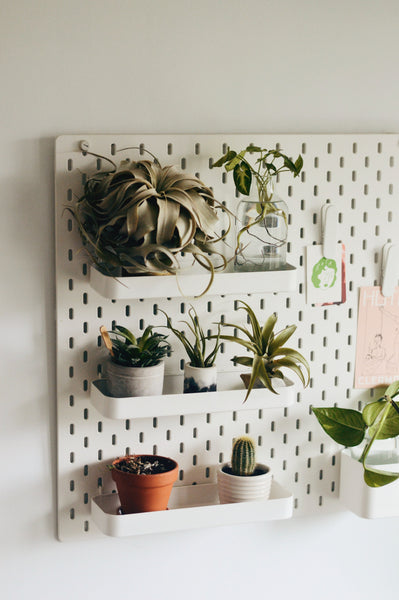
Photo by Jennifer Chen
Troubleshooting
Tillandsia Pests and Diseases
Watch out for mealy bugs and scale as these are the most common pests that plague the Tillandsia. Mealy bug is easy to spot, with its white cotton like appearance. Scale is a little tougher to spot so always give your plants a good once over when watering. If you notice anything, quarantine the plant and treat with a natural oil.
The most common diseases will occur from high moisture or excessive humidity. Rot, or mould or fungal diseases will occur, which is why its so important to provide your plants with good air circulation, especially around the base of the plant.
Leave a comment